Thursday, March 13, 2014
Pesto Pasta
So I know I usually just post crafty things on here but once in a while I like to post about something yummy, and today is one of those days. I was hungry and rummaging through my cupboards to see what I wanted and realized I need to go grocery shopping ;) but I did have some pasta. Pasta, my faithful friend; I always keep pasta and rice handy, because even with just butter salt and pepper it's delicious. Today I chose pasta because I had a little bit of pesto sauce left, and decided to throw onion and garlic in there just because. A lady I work with told me that if you add garlic to your diet, like every meal add to your diet, it will keep mosquitoes away from you during the summer, and since I usually turn into a giant bug bite in the summer and I love garlic, I've been adding it to every meal I can. And I like onion. I chopped half an onion, put in maybe a tablespoon of garlic (I have an jar I bought from the grocery store that's all natural, but you could use any type you like)and and a spoonful of butter into a frying pan to cook it up a little bit, on medium heat. When my pasta was finished cooking (I put that on to boil first), I added the rest of my pesto sauce, it was close to a quarter cup, to the onion and garlic mixture to heat it up, drained and rinsed my pasta, and added it all together. It was delicious. I will probably never eat pasta and pesto by itself again! I ate it so quickly that I totally forgot to take a picture of it...oops! Update on the tree of life...this one's not so great either. It's better than my first one, but I was going for an ombre look, so I had to use different types of beads to get that look and I don't really like the look of different beads. I'm going to finish this one as well, but the next one I'm just going to use one type of bead and I think I'll have it down pat. :) Happy crafting!

Sunday, March 9, 2014
Tree of Life
So I've crocheted myself out for a while, I have one headband to finish for somebody and then I'm going to take a break and focus on some jewelry I think. I'm edging my way there even now though and I've been working on a project for the last few days I thought I would share here. I made a tree of life, I've been seeing them everywhere and thought it would be fun to make. It was, but you can definitely tell this is my first ;). Unfortunately the site I originally found instructions at no longer exists and all the other sites were selling them not giving out instructions so I had to wing it based on my memory of the instructions I read, oh, a few months ago. For having virtually nothing to go by I think I did fairly well, but I'll definitely be making another one (that will hopefully turn out much better) and I'll try to do a tutorial along with that one. For now, here's a picture of mine:
 I used earthy colored stone chip type beads, with a couple purple and red ones thrown in, and I wrapped brown, gold, and green seed beads along the outer edge. To make the basic "form" I guess you'd call it, I wrapped 20 gauge wire around the bottom of a coffee thermos (mostly because for the size beads I wanted to use it seemed like an appropriate size circle, my next one will probably be smaller because I'm planning on using smaller beads), and I used 24 gauge wire to make the tree and wrap the seed beads around the circle. I also formed the loop at the top with the 24 gauge wire. I need to find some leather or twine so that I can hang this up in my window, as soon as I do I'll take a picture and post that as well. Anybody else out there making a Tree of Life and have any tips for those of us winging it? Would love to have you share them!
 I used earthy colored stone chip type beads, with a couple purple and red ones thrown in, and I wrapped brown, gold, and green seed beads along the outer edge. To make the basic "form" I guess you'd call it, I wrapped 20 gauge wire around the bottom of a coffee thermos (mostly because for the size beads I wanted to use it seemed like an appropriate size circle, my next one will probably be smaller because I'm planning on using smaller beads), and I used 24 gauge wire to make the tree and wrap the seed beads around the circle. I also formed the loop at the top with the 24 gauge wire. I need to find some leather or twine so that I can hang this up in my window, as soon as I do I'll take a picture and post that as well. Anybody else out there making a Tree of Life and have any tips for those of us winging it? Would love to have you share them!
Thursday, February 20, 2014
Busy Busy Busy
Very sorry I haven't posted a new craft in a while, I've been busy trying to stock up on some mug huggers and headbands, with a few flowers and bows in between. I've also got to schedule a cleaning day around the house, crafts are so much more fun than laundry :( But alas, I do need clean clothes! I've got some fun things I'm wanting to try and as soon as I do I promise to post about it! Until then, happy crafting (and chores)!
Friday, February 7, 2014
Boot Cuff
(Computer crashed in the middle of this one last night, very sorry I didn't get it posted until now) Remember how I said I like multi-functional? That is why the hdc is my favorite stitch ever. You can do so many things with it you just can't do with other stitches. For example, you can make a ribbed look which is what we'll be doing here. In the mug hugger tutorial I said there were two loops you can crochet through, which is true, but in actuality there are 3 loops you can crochet through with a hdc, and if you crochet through the back loop it will create a ribbed look. Start off this project by chaining 11, and doing hdc across for a total of 10 hdc. Chain 1 and turn. This first picture is of the two loops we would normally go through.
 This next picture is showing you the "hidden" 3rd loop we'll be using in this project.
 It can be a little tricky to see the first time; when you look at the top of what you just crocheted you will see two loops, the normal loops, turn the top away from you so you have the flat part of the piece facing you. Just under the "back loop" from the top there will be another loop you can slip your hook into. It help to spread out the stitches a little bit. It should look like the top but backwards. Hdc through that 3rd loop all the way across, making sure to have 10 hdc in each row. Always chain 1 before turning your work. You'll need to make 30 rows of hdc. This pattern took me a while to figure out how to count rows, but i finally did figure it out so I'm just going to tell you what to look for and if you'd like the explination behind the madness feel free to ask me and I'll explain it to you. On one side of your work there will be a "rib" very close to the bottom. Always look at that side when counting rows. That first rib is 2 rows, and every "rib" after that is another 2 rows. Stop when you get to 30 rows or 15 "ribs".

 The first picture is what you want to look for. Now you're going to want to slip stitch the two ends together and flip the seam to the inside. IMPORTANT: don't cut the yarn yet, this piece is all one, we'll be working in the round now. With the outside facing you chain one and single crochet 2 times between each rib.
 Do that all the way around and slip stitch back into the first sc. Now the fun part :) Chain two and work 2 hdc into the same sc you slip stitched into. Skip two sc, and then 3 hdc into the next sc, chain 1.

 You can kind of see the two sc I skipped, and the next one is chaining 1 after the cluster.
Do this all the way around until you reach the first hdc cluster. When you get to the end you may not have exactly enough sc to skip two and then do a cluster, that's ok, this first row doesn't have to be exactly perfect, if you've got more than 2 sc left do a cluster in the middle of them. Slip stitch into the first cluster. Chain two, hcd 2 into same stitch, and then in chain 1 space from the previous row you'll do another 3 hdc cluster.
 This is just showing you to go through the space left by the chain 1.
Do 6 rows of hdc clusters. When you've slip stitched your final row in place, chain 1 and sc all the way around.
 Slip stitch to join, make the knot tight, leave a tail to weave in and cut off the extra. One final step. You still have the tail from the very beginning to work with. Sometimes the tail ends up on the front and sometimes it ends up on the inside. I haven't figured out rhyme or reason to that yet. If it's in front just pull it to the back, then either way weave it in a little bit and cut off the extra. All done, just one more of these and you have a fantastic pair of boot cuffs!
 Depending on how high you like to wear your cuffs you can add the Little Bow or the Flower we just made to hide the seam a little better, I wear mine down pretty low in my boots so that wouldn't work very well. Any projects you have out there that little embellishments could be added to for a sweet new look?
Thursday, February 6, 2014
Flower
This embellishment is so quick and fun, you can whip up a whole bunch in just a short amount of time. I also like it because it looks like a cherry blossom and makes me think of my brother stationed in Japan. To start chain 5 then slip stitch into the first chain, creating a circle.

 Now the petals: for the first petal, you'll start by chaining 1, this counts as the single crochet you'll do between each petal after this. In the hole you made in the circle, not one of the chains, do the following: hdc, dc, hdc. That's it. You'll do each petal 5 times, with a sc between each, except after the last petal you will slip stitch into the first chain you made.
 That little tiny stitch that almost doesn't look like one is the chain you need to slip stitch into. Then tie a knot and weave in the ends to the back, the knot won't be noticeable once you weave the ends in.

 I need to make a few light pink ones to add to one corner of my scarf to dress it up a little. Any embellishments you're fond of that you'd like to share?

 Now the petals: for the first petal, you'll start by chaining 1, this counts as the single crochet you'll do between each petal after this. In the hole you made in the circle, not one of the chains, do the following: hdc, dc, hdc. That's it. You'll do each petal 5 times, with a sc between each, except after the last petal you will slip stitch into the first chain you made.
 That little tiny stitch that almost doesn't look like one is the chain you need to slip stitch into. Then tie a knot and weave in the ends to the back, the knot won't be noticeable once you weave the ends in.

 I need to make a few light pink ones to add to one corner of my scarf to dress it up a little. Any embellishments you're fond of that you'd like to share?
Little Bow
Ok folks, I'm back. Pinkie is still not 100% up to par but I was having crafting withdrawals so here I am! I've got 3 things to share but I'm going to do them in separate posts so this one isn't 10 miles long. These first two are going to be the embelisments I promised for the mug huggers, but they also look adorable on the last project I have tonight, boot cuffs. Let's not get ahead of ourselves though, first, a bow :)To make the bow you'll use the same pattern we used for the mug hugger, except you're only going to chain about 5 and only do a few inches long. You can adjust these measurements depending on the size you want your bow to be, this size just works well for me :) When you have finished, slip stitch the two ends together and finish it just like we did on the mug hugger. Here's where it's different. Now you're going to take yarn, I use the same color but you can definitely use different colors for pizazz, and tie a knot around the middle of the piece with the knot in the back by the seam.

 Now just wrap the yarn around that knot until it's as full as you'd like. Now, pull the yarn under the wrap once, cut off a long tail, and pull it under 1 to 2 more times.


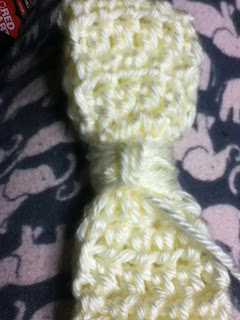
 Last step: weave the extra from the tail through 3 or 4 stitches, cut off the excess, and voila, you have a bow :)
 Pretty simple, but I like my projects that way, quick and easy, and also multi functional! Happy crocheting!

 Now just wrap the yarn around that knot until it's as full as you'd like. Now, pull the yarn under the wrap once, cut off a long tail, and pull it under 1 to 2 more times.


 Last step: weave the extra from the tail through 3 or 4 stitches, cut off the excess, and voila, you have a bow :)
 Pretty simple, but I like my projects that way, quick and easy, and also multi functional! Happy crocheting!
Saturday, January 25, 2014
Apologies
I do apologize that I haven't posted any crafts in a little bit, I sprained one of my fingers early this week and I'm having a hard time doing any crafts at all. It's starting to feel better so I'm hoping that by next week I'll be back to normal and can post some exciting things for you all! Until then, happy crafting! :)
Subscribe to:
Posts (Atom)